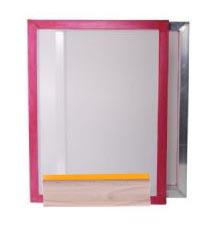
Silk Screen 31×22 & 18″ Squeegee
Aluminum-ready stretched screens ready to go. Professional quality.
The Silk Screen 31×22 & 18″ Squeegee frame is 31 inches x 22″ classified as an A1 size, perfect for A2+ images. the tension on the Swiss mesh is 25 newtons. the mesh has been glued to the frame using kiwo 1000′
Please choose the mesh count you need. here is a list to help you choose.
43t white mesh, the most commonly used mesh count used for printing text. The solid prints regarded as a coarse mesh.
55t white mesh, used for printing onto light-colored fabrics with finer detail. It will hold a halftone dot of 36 lines per inch.
61t white mesh, top-end mesh for water-based ink. It will hold a halftone 41 lines per inch. To print onto most paper textiles wood plastic glass-ceramic.
77t yellow mesh fine line work and fine illustrations halftone 50 lines per inch. most solid substrates.
90t yellow mesh is the common daddy mesh for halftones. 62 lines per inch, basic all-round use for most inks onto most substrates, water-based inks. It will need a retarder with this mesh. use for under base for dark fabrics.
100t yellow mesh as same as the 90t but finer line work,
120t yellow mesh, same as above even finer line work.
Comfortable print image size 16″ x 21″
The Wooden Squeegee with a square-cut blade is 18″ long. The blade is 70 shore ideal for water-based and solvent-based ink.
Printing screens
Included in this Screen printing kit
Silk Screen 31×22 & 18″ Squeegee
wooden squeegee with a 70 shore square blade.
The first step in preparing the screen for printing is to mask off the edges of the stencil
areas next to the frame where there is no emulsion, and block out pinholes or voids in
the stencil.
This will prevent ink from leaking and contacting unintended areas of your
substrate.
Using tape intended for this purpose is preferred, that is, tape that won’t
become saturated from ink or ink wash. Furthermore wont fail or come off and won’t leave adhesive
residue in the mesh that can be difficult to wash out during reclaiming.
Although some Screen printers use regular packing or masking tape, these do not have all of the
advantages listed earlier. Pinholes and voids can be blocked out with any water soluble
liquid block out and a small paint brush.
Some screen printers prefer to block out using
their regular emulsion and a brush and then post-exposing it to harden up the repairs.
One advantage of this is that it tends to be more durable on long production runs.
Silk Screen 31×22 & 18″ Squeegee
1)First, Using 2” or 3” wide tape, take small pieces of tape (approximately 2”X3” or 4”
each) and fold into sort of an inverted pyramid shape so that each piece can be placed
on the squeegee side of the screen in each corner. The tape should be attached to
the inside wall of the screen frame and connect the frame to the squeegee side of the
mesh, bridging the gap between the frame and the mesh. These pieces of tape should
look like the inside corner of little boxes when properly folded and attached in each
corner of the frame.
2)Screen printing kit After all four corners are taped, lay a strip of tape along all four sides of the screen
frame, again bridging the gap between the frame and the mesh and creating an “ink
well.”
3)Screen printing kit Next, lay another width of tape (slightly overlapping) along the inside edges of the
first “border” of tape on the squeegee side. You may get by with going around the inside
of the frame only one time, as long as the tape covers open areas of uncoated mesh.
Silk Screen 31×22 & 18″ Squeegee
4)Screen printing kit 90t Flip the
screen over to the print side and lay a border of tape on this side. Match
the width of the entire border on this side to that of the squeegee side…if you made
two rows on the other side make two rows on this side. You will be able to see through
the emulsion to line them up, This doesn’t have to line up perfectly, it’s just that two
layers of tape is that much less likely to allow ink to leak through…and that’s the main
purpose, although it makes cleanup a little easier, also, as ink won’t get under the frame
between the frame and the mesh.
5)
Silk Screen 31×22 & 18″ Squeegee
The last step is to block out all pinholes and voids in the stencil. Keeping the glass
on your exposure unit very clean will eliminate a lot of this. So will degreasing, but it
invariably occurs anyway. Examine the stencil very closely by placing it on a light table
or holding it up to the light and carefully scanning the entire surface of the mesh with
your eyes. Wherever you see small pinholes or voids, take a small brush, dip it into
the
liquid block out and cover the hole by dotting or “painting” it with the brush. NOTE
– BLOCK OUT PINHOLES ON THE PRINT SIDE ONLY. Applying block out on the
squeegee side will impede the print stroke. Allow the block out to dry thoroughly.
6) Finally, you’re ready to start screen printing!


